Most of my lovely regulars have been following the development of
this particular mini-project in past posts, but a few such lovelies
suggested a Master Post with the whole process, materials and more
comprehensive insight into the struggles and victories I experienced
while bringing Miss Julia to life. I think it's a brilliant idea. Not
only do I hope that it inspires others in their endeavors, but it
will help me when I start the next mini-project: IE Julia's
counterpart, OniSan.
It's going to be a big post...so hold onto your butts.
The Idea. The original plan was to make a fully functioning
stop-motion puppet, something akin to Coraline or ParaNorman since
creating characters for
LAIKA is my dream job. To begin, I watched
every stop-motion movie plus their special features I owned or could find legally online and scoured
through the two books that I got for my birthday on stop-motion:
- Stop Motion: Craft Skills for Model Animation: Edition 2 by Susannah Shaw (Recommended by LAIKA on Twitter and gifted by Mom)
- The Advanced Art of Stop-Motion Animation by Ken A. Priebe
(Gifted by Raul – whoever wants to gift me part one will be
loved forever)
Both wonderfully helpful for people making puppets and for people
animating puppets and really for anyone interested in stop-motion.
After sticky-noting my way through these and doing some more
Google-based research on custom part costs. It became clear that as much as I
wanted to learn/strengthen my molding/casting and tinkering
abilities, I would not be able to make her a puppet this time around.
It would break my budget and kill my savings for our impending
relocation. As I wasn't planning on animating her either, I couldn't
justify the cost, no matter how cool. So the goal was revised to be:
make a detailed multimedia sculpture – similar to the
Swamp Witch
I made for Joan Kresek's Illustration Media class but better. I could
use that for displays and for lighting reference and it'd still be
cool. Huzzah for multitasking!
The Materials List. Most if not all of these materials were
already on hand since Raul does a lot of sculpting and I also have a
bit of a sewing/cross stitch hobby on the side. (Comes from being raised by a mob of quilters) Everything else came from local
craft stores such as Michael's, JoAnn's, and Meiningers.
- Armature
- Paper to cover workspace and tape to hold it in place
- Armature and Jewelry wire For building the skeleton of
the armature
- Piers For trimming and bending wires
- Epoxy Putty For solid, immobile areas
- Wood Base and screw/nut For a stand
- Tin/Aluminum foil For building the bulk areas of the
armature
- Calipers For measuring things
- Sculpt and Paint
- Super Sculpy (The peach stuff) For sculpting itself
- Turpenoid For smoothing out the clay
- Various sculpting tools For shaping the clay
and smoothing surface
- Acrylic Paints – opaque, translucent, glimmers For
painting the baked sculpture
- Acrylic gloss medium For “wetting” eyes
- Brushes and water cup/paper towels and Palette paper For using the paint
- Hair
- Embroidery floss – various colors Primary hair material
- Glue Gun and glue sticks For securing various materials in
place
- Jewelry wire For structuring curls of hair
- Scissors For snipping things
- Tweezers For precision placements
- Costume
- Two varieties of a basic costume satin. For the dress
- Two varieties of satin ribbons For the ribbon-y bits
- Tulle For poofing up the skirt without adding
too much weight
- Lace For details
- More Embroidery floss – same color as lace For hand-made
lace
- Thread and Needle and Sewing Machine For sewing and
fastening things
- Bristol board paper For “stiffening” the corset
- Seed Beads For pearl details
- Jewelry Charm (From Britt) For broach detail
- Pins For holding stuff together
- *Had I a functioning Iron I would have used that too, for pressing seams more neatly. That's a Christmas Hint - Mom or Nana - Practical and Fun. ;)
- Prop
- Scrapbook paper For the paper fan
- Thin, squared dowel For the support of the paper fan
- Regular glue For fastening the fan together
Of course I had a separate area reserved for working so I didn't
have to waste time packing up each night. And I moved the lamp from
the bedroom to the studio for more/better light. I mentioned before
that I don't have quite enough light in the studio area, but what I
do get from windows is cold north light as opposed to the lamp's
predominantly warm light. This gave me a good sense of how my colors
were engaging each other in various scenarios – since she won't
always be sitting up in the studio. The unofficial materials list
looks like this:
- Large glass of Milk For drinking/hydration - very important
- Snack foods For snacking
- Speakers For listening to Raul's Spotify
- Raul For immediate consultation
- Circle of Trust For ongoing feedback
- Cell Phone For checking time and occasionally
communicating with various people
- Internet For ongoing research and other such things
The Process.
I started with piecing together the development page so I wouldn't
be guessing along the way in terms of what I wanted her to actually
look like or what materials would be most practical. A good deal of
the
researching started here. I looked at everything I could think of
that would pertain to her character and the sculpt and I looked at
things that might not necessarily be related, but I stumbled into and
found interesting anyways. (This is a habit I thank my Mom for and also
why I know so much random crap) I like to think I have a pretty good
sense of what works and what doesn't when I have a clear picture of
what I want the outcome to be. There's always some room for trial and
error, but most of the time I end up with satisfactory results within
the first two construction attempts. I find it best to spend a lot of
time in this phase so there are fewer frustrations and broken
hearts (limbs) later.
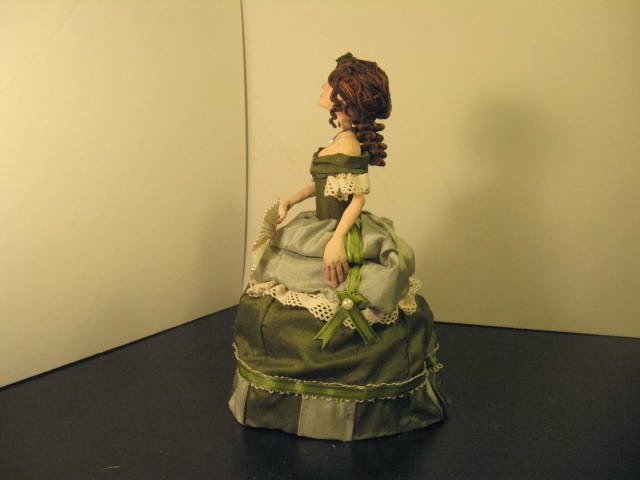
When I was FINALLY happy with her (This wasn't the
first iteration
by any stretch of the imagination) and the costume I made an
orthographic image to scale of the final model. She stands 9.5”
tall, so a little larger than the proportions LAIKA used for
Coraline, who I believe stood about 7”. Drawing the blueprint
allowed me to trim wires consistently to the right lengths (Calipers are super useful doing that) and build
up the appropriate amount of cushion with the foil so as not to
over-due the Sculpy and have problems baking.
I referenced a video tutorial that
Jordu Schell made for the sculpting
techniques as well as pestering
Raul for his advice. (He sculpts a
LOT of dinosaurs/creatures and was actually working on
something-that-looked-like-a-hammerhead-newt-whose-scientific-name-I-can't-remember-and-I-feel-his-eyes-judging-me-even-now
while I was doing this project) The hands were super hard. I did them
once. Hated them and tore them off. Tried again. Hated them and tore
them off. And then I rewired the finger armatures and tried again.
Passable. Even though I wrapped them all separately in foil before
baking...two still stuck together – eliminating my hopes for giving
her gloves, like in the drawing. I followed the baking directions on
the box of Sculpy – about 15 min at 275F – removing a shelf in
the oven so her head wouldn't be too close to the coils. Thankfully
nothing burned.


From here I could have opted to utilize the already peachy tone of
the Sculpy, but I've never been fond of that color so I built up layers of
skin – used pretty much every color under the sun...except maybe
yellow. When I was ready for the smaller details of the face I
proceeded cautiously, using the glimmer stuff sparingly on her lips
and eyelids and saving the gloss medium on her eyes for the last
touch. I added her little pearly necklace at this point with a seed
bead and embroidery floss and a TINY drop of glue.


Next came her hair, which was super fun. Ideas of using my own
hair were fizzled by the glue gun which liked to melt and burn things
without my permission. In the end there was probably more glue on the
table than on the project due to the gun dripping so much which was a
bit disappointing. Didn't burn my fingers nearly as much though. I
started with her lower, larger curls which are wires wrapped in
embroidery floss (Got the idea from ParaNorman special features when they were talking about making Neil's hair).
They were the first glued on. I had to reposition one and
accidentally cracked her neck, but it's a hairline deal that paint
covered up. If I hadn't just told you, you probably wouldn't have
noticed. Then came the hiding of those wire ends with some very
careful arrangements of “roots” and such. After that came the top
of her head and the side curls, equally hidden amongst “roots”
and finally her bangs which wove back into her bun. It was an
exercise in problem solving for sure and I was really thrilled with
how it turned out. In the Swamp Witch I had to braid clay for her
hair and roll a million coils which I am admittedly not great at even
though it came out okay. Embroidery floss is much easier, lighter and
cheaper. It also comes in all sorts of fun colors and it's like
string cheese – one strand breaks into 6 – who doesn't love that?


Next came the layering challenge of her costume – the real
tricky part. I started playing around with the Bristol for her corset
first before realizing the skirt should probably come before that if
I was going to hide those seams effectively. So the first thing was
the underskirt. This involved cutting out the pieces for the skirt (I
didn't make a mini pattern for this like I did the
mini corset a while ago, I guesstimated it based on the last skirt I made for
myself) and sewing those seams. Cutting out the lighter green
rectangles for her bottom hem, gluing those in place. Cutting the
ribbons, gluing them together and to the skirt. Sewing the back seam.
Prepping the waist cinch. And the grand finale of that layer – hand
stitching the smaller lace. I used a basic backstitch so I didn't
have to be as concerned with loosing loops than if I used a regular
forward stitch. Once done I dropped it over her head and cinched it
in place. (I bunched up the tulle and stuck that underneath to keep
her skirts poof-y, probably could have used something else, but I had
it on hand and it's not like she's going to be walking around much)


Next came the upper skirt, which I started the same way as the
lower skirt. Once I had it cinched in place I glued the lace on the
bottom edge (should have done that sooner) and used a hand needle to
pull up the gathers and tack the ribbons in place. The bow was
probably the one place where I could have spent a little more time on
to get something closer to what I had in the drawing.

Next I wrapped the Bristol corset in more fabric (GLUUUUE) and
wrapped her up snugly, which hid the aforementioned skirt seams. Next
time I'll give it a bit more clearance in the armpit region so
fitting the corset will be easier. I also cinched some of the lace
for the sleeves. It wasn't until I was writing this that I realized
that I forgot part of her sleeve. That's what I get for stashing the
reference picture before I finished. Won't do that again. After the
sleeves, I very carefully made the collar piece – opting not to do
the hand lace there since that wasn't exactly fun the first time nor
did I think it ended up subtracting much from the design. The jewelry
bit came from
Brittany's vast collection of jewelry coolness (THANK YOU)
and I nipped the top part off with a pliers before gluing it in
place. The seed bead there I had to sew on by hand.
The fan was fun and a lot more trial and error. I have a LOT of
fans around my apartment, but I still had to basically guess how to
cut the appropriate shape out of paper. 4
th try got it.
Then I had to fold tiny folds back and forth. And then glue the
dowels bits in place and all that to her hand. Probably better that
the gloves didn't work out at this point.
Then all the photography! My little brother took those classes in
high school, but I didn't have room for them and the
animation/advertising...kinda wish I had taken at least one of them
though. I set her up with a blank background and used every lamp I
owned to try and get something workable. My little power shot camera
wasn't the best – nothing like the SLRs I had access to at school –
but it worked well enough for the time being. I'll see if I can get
better pictures before this fall. In terms of final victories – she
looks MUCH closer to the drawing than the Swamp Witch did to her
drawing, so vast improvement with my 3D skills/my ability to
translate 2D to 3D. Albeit a few tweaks I am very pleased. Reminds me a little of
Red Nose Studio. Love his work.
The Conclusion. Just because the sculpt was done, didn't mean I
could rest. I had been doing some
doodles of Julia while building the sculpt and taking all the process pictures, so I spent another chunk
of time cleaning those up, formatting pages, etc. so I could have
those four pages ready to post with the finish. I still have one more
to do – her “beauty shot” - one visual development illustration
featuring her. I'm contemplating thumbnails, but I may wait to
revisit her until after I'm further along with OniSan's mini project.
Wouldn't be much of a portfolio to just have one character in it. lol

I think in total she took me about 15-20 hours, but that was
spread out over several nights and about half a weekend due to the
day job – patience was key on this, I tried really hard not to rush
or get ahead of myself – which translated to me looking like I was
just staring at her for hours I'm sure. Definitely think I leveled up
though, so I guess it's time for a quick character sheet update. :)
If anybody thinks of something I forgot or wants to know something
even more specific,
please leave me a comment and I'll reply ASAP. I hope to take her "on tour" this fall *fingers crossed* so anyone heading to CTN can come check her out in person.
Onwards to OniSan!! :D